Add a video to your website
A few tips:
- Plan the route you’re going to walk through the apartment
- Turn lights on
- Draw blinds if window view not ideal (e.g. parking lot)
- Close toilet seat lids
- Recommend not adding a narrative unless you’re really good at this – usually, some nice background music is better
- Keep it short, ideally 1 minute or less
Editing:
- Cut out all unnecessary parts – keep it short!
- If you’re tech savvy, add your logo and a text title
- Speed up the slow parts so the video is shorter, like this
- Export as high quality video in either .mov or .mp4 format
Consider hiring a professional for this one-time investment. It’s “evergreen” content, meaning you can use it for years so just like property photos, it’s worth doing well.
We recommend YouTube because you’ll get a nice SEO boost from Google, and YouTube gets a ton of traffic as well.
- Ideally upload to your corporate YouTube channel, or a channel for your property. If not possible, send the video to TourVista and we’ll add to our YouTube channel.
- Title: Video Tour of {Content} – {Property Name in City, ST}
- e.g. Video Tour of 1 Bedroom Apartment – Arrowhead Apartments in Burien, WA
- Description: start with “Visit us at https://www.sitehere.com” then include a paragraph or two describing the video and property. This helps a lot with SEO.
- Thumbnail: pick the best one, or upload a great photo that’s representative of the video.
- Audience: “No, not made for kids”
- Tags: enter a few keywords that are relevant, e.g. Property Name, Apartments in City, ST
- Category: we use People/Blogs
- Video Location: very important! Enter the full property address. If it’s not saving this, just enter the City, ST
- Visibility: Public
Once published, review your video and confirm all good.
Copy the video URL. You’ll need this in the next step, it will be something like https://youtu.be/PLSxqwS2UYU
Add background music: (recommended) Browse YouTube’s royalty-free library and pick a song. Then load the video editor and select your song. It may take a few minutes for the audio to show up in your video.
Ah, the final step! You’ll be editing this section:
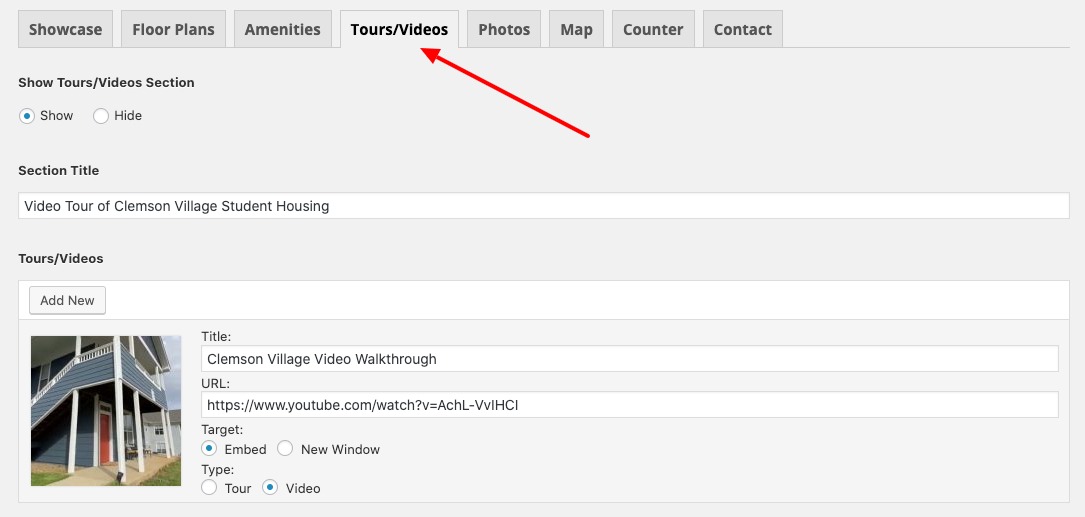
- Login to your website
- Edit the Home page and click “Tours/Videos” tab
- Select “Show” option
- Enter a catchy Section Title, e.g. “Take a Virtual Tour” or “Watch Our Video!”
- Click “Add New” button and fill in the fields for each video
- Title: short description of video
- URL: the full URL from YouTube
- Target: “Embed” will show in a lightbox, keeping the user on your site (recommended). “New Window” opens the video in a new browser tab.
- Type: “Tour” shows a 360 icon, “Video” shows a play button (recommended)
- Image: select a thumbnail to show on the website. Or you can upload a thumbnail from the video (i.e. take a screeshot – we recommend naming the file video-tour.jpg and crop to 1200 x 800 pixels)
When done editing the Home page, be sure to click “Publish” to save your changes. Then always smart to view the website and confirm all looks good!
Email TourVista and we’ll update the top navigation to include a Video link, like this:
